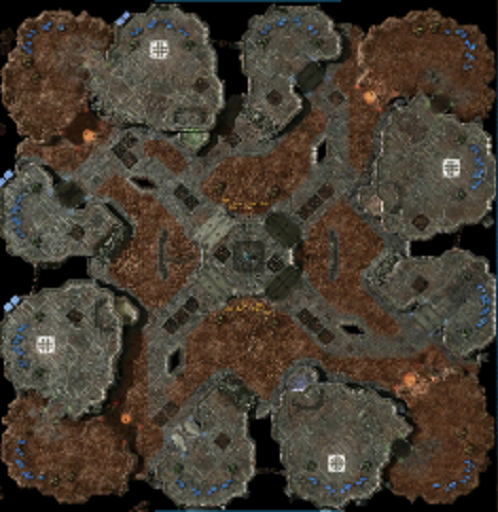
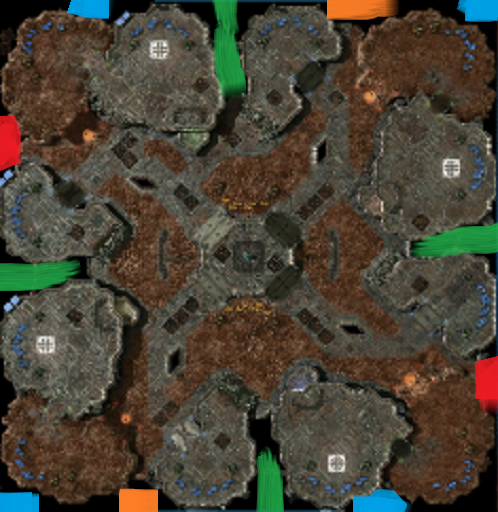
Starcraft 2 Antiga Shipyard Map StrategiesStarcraft 2 Strategy Guide --> Starcraft 2 Map Strategies --> Antiga Shipyard (you are here) Antiga Shipyard is one of the new Starcraft 2 maps players are competing on for Season 3 of ladder. In this article, we will be going over the best builds and strategies you can use on this map for each race match-up as well as noting any significant advantages based on spawn location. Starcraft 2 Antiga Shipyard: Map Overview
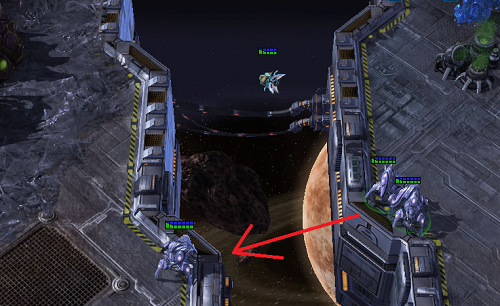
Spawn Locations and Map Size As you can see above, there are 4 possible spawn positions on this map (marked with the white square on the map. The natural expansion is fairly close to the ramp to the main. Overall, this is the largest of the new maps. It takes a worker about 45-50 seconds to move from your ramp to your opponents ramp on close spawns (45 for top, 50 for both left/right) close spawns (both top or both bottom), 50 seconds to go from the ramp leading out of your main to the top of your enemy's ramp on the close spawn (just under a minute for far spawns). This large map distance undoubtedly makes this map great for macro games, except in a specific situations which are mentioned below. Expansions The natural expansion features a wide entrance - it's not exactly going to be hit from all sides, but it will take quite a few buildings to wall off. It's not as open as Metalopolis is, but it's not as tight as Shattered Temple or Abyssal Caverns either. Overall, this is the largest of the new maps. It takes a worker about 45-50 seconds to move from your ramp to your opponents ramp on close spawns (45 for top, 50 for both left/right) close spawns (both top or both bottom), 50 seconds to go from the ramp leading out of your main to the top of your enemy's ramp on the close spawn (just under a minute for far spawns). There is a third expansion for each main base which has two ramps: one close to your natural and a very wide one that is exposed once destructible rocks are taken out. There are also two high-yield expansions in the center of the map. They are wide-open and definitely hard to defend, especially since they can be hit from the high ground where the Xel'Naga Tower is. Protoss Strategy Overall, not a bad map for Protoss players, especially if you like the macro game. If your playstyle is a little cheesy though, the map's size may throw you off. Protoss vs Protoss This map is the only new map big enough where you at least have a chance to viably open with something other than a 4-Gate. I wouldn't recommend grabbing an expansion by any means, but you at least have the option of going 3-Gate Robo or even 3-Gate Blink Stalker. If your Blink micro is really good, I think a 3-Gate Blink Stalker build can be really good here. You can easily defend your main and do a lot of harassment as you can quickly Blink from the low ground into the main base, both offensively and defensively. This of course gets you ready to transfer into DTs, which are strong at all levels when gotten relatively early in PvP - getting out multiple Observers takes time, so warping in multiple DTs and then splitting them up is really effective. You can even surprise the enemy player here by Blinking across the gap at by the clockwise third into your opponent's main - you need an Observer for this and good micro (i.e. "shift-click blinks", one Stalker at a time):
This puts you close to the mineral line and gives you a safe exit out of the main, especially if the rocks aren't destroyed yet leading up to the third where you Blink from. These few extra seconds can give you the time you need to perform hit and runs, as well as give you a safe place to warp reinforcements too (a Pylon where the Stalkers are in the pic above works just fine). Protoss vs Terran On this map, you have to be really careful about spawn positions. If your opponent spawns counter clockwise to you, your main base can be hit with Siege Tanks from the safety of your opponent's third base, which sits on raised ground. One way you can prevent this before it even happens is to take out the rocks very early in the game that grant a second entryway to the opponent's third base. A few Zealots can do this task before the Terran player even knows it. The key is to do it early if you know you want to play a macro game. It's a lot harder to take down the rocks when there are Siege Tanks on the other side! For the average player though, this map is not good for the macro game for Protoss in PvT, simply because the bases are so spread out. If you're not a Diamond-level player, even an average Terran player can pick you apart in the late game with drops. If you're not already an expert, you may want to consider going for a timing attack off of two bases. You can open with 2 Gate + Robo Bay, grab an expansion, quickly get +1 armor and Colossus range and then push as soon as you get 4 Colossus out. Protoss vs Zerg Strategy While this map is large, the entrance to your natural is big enough where a Forge Fast Expand build is not a viable option. Your ramp would look something like this:
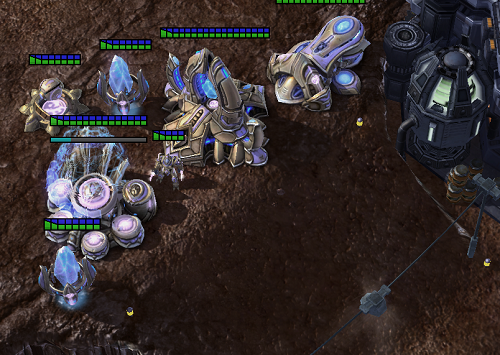
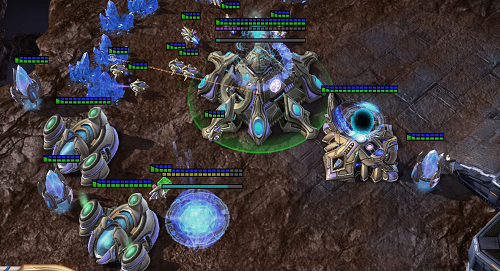
..which just doesn't seem like a viable option. In Retrospect, you might be able to push the Pylon up to plug the gap, but then I am not sure if you have the power you need to get the Forge down. You could move the Cybernetics Core up and place another Gateway down where the second Pylon is to eliminate the need for a Zealot in the wall... but dropping down 4 buildings just to wall off your ramp is a huge investment. A good Zerg would easily have a third base being constructed by time you had your second Nexus down if they saw this! A much better alternative is to use your Nexus as part of your wall and leave a small opening:
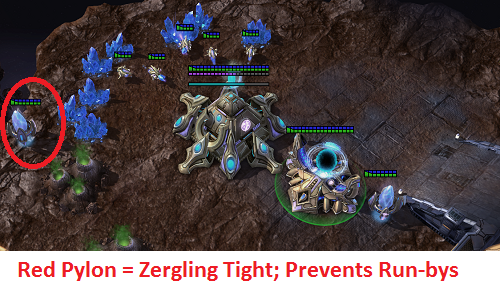
This way, you only need 3 buildings to build your wall up. The set-up above will prevent Zergling run-bys in the early stages of the game; you can seal off the rest of your base with just a Force Field or two. A bit further into the game, you can beef up your wall even more without interfering with mining:
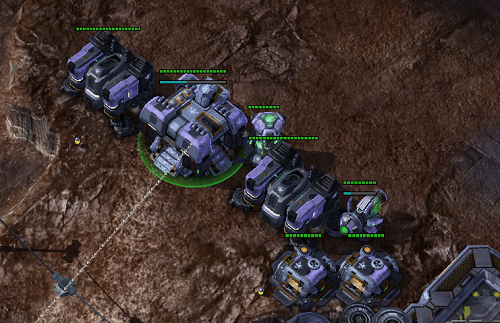
If you suspect early pressure or some sort of Roach bust, you can drop a cannon or two behind the Gateway and in the back of the mineral line to cover all your Probes. Typically, you'll want to grab 3 Gateways and get Warp Gate technology before throwing down your Nexus. You can build your Cybernetics Core and first gateway at the top of your main ramp to make a wall, and then build your second Pylon and Gateway on the low ground to start making your wall. Your Gateways should produce Sentries initially as they only cost 50 minerals and you need the minerals for your Nexus. Most top players get out 5 Sentries when opening with this build. From here, you can either progress into a 6-Gate timing push or a standard macro game with Colossus or High Templar/Archon, depending on your opponents build and what they are up to. Dark Templar are also a strong play once your opponent gets several bases, especially given the distance between bases here. Terran Strategy For Terran players, spawn location can have a major impact on how you decide to operate on this map. The best spawn location Terran players can get is spawning in the adjacent position clockwise to their opponent. In other words, if your opponent spawns in the bottom right base, you want to be in the bottom left. If they are in the bottom left, you want to be in the top left. The reason for this is that the Terran player can actually siege their tanks up at their third expansion and shell the gas at your main base. This is a very obnoxious strategy and can be tough for your opponent to deal with. You can even Siege up at the third and then start ferrying your units over to the opponent's main. The gap is only a few steps so your Tanks can protect you from any counter attack this way. You can then use a fleet of 8-16 Marines to cause a ton of damage in the main while most of your forces are back in a safe position. On cross-spawns, you have the option of playing a standard macro game. Note that although this map is very big, it is not like it has a huge number of bases compared to smaller maps. Rather, the maps are more spread out. In this situation, things like Planetary Fortresses become very valuable as it's hard to reach your bases to defend them all. Likewise, drops are very strong and the mobility of bio builds is definitely palpable. Terran vs Protoss Strategy As mentioned above, if you get a clockwise spawn, you can really cause some damage by moving quickly for a third base. You can open with a simple 1-2 Rax fast expand, dropping a bunker or two if needed at the ramp to your natural expansion. Once your natural is secure and you have tanks out (tanks on the high ground at the main and the third really go a long way), take your third and make sure you drop a Planetary Fortress there. You can set up Siege Tanks along the border of that base and start shelling the main (at least the Assimilators) from this position. You can also move a few tanks toward the point position behind the rocks to make it hard for the Protoss to counter. Once you have caused some damage from your third, drop 8-16 Marines right in front of your tanks and slowly push them into the base. Stim, run in and take out a building, then fall back to your tanks when the Protoss player tries to take your units out. You don't have to load the Marines back up - just stim them and run against the edge of the wall and your tanks will protect you. Make sure you have Viking support to take out any Colossus. If you really want to be a pest, you can even nuke from this ledge from the safety of your tanks and force mining to stop. On cross spawns or same-side spawns, you're set for a long-term macro game. Your expansion is easy to take and defend and I recommend doing so early. You can even grab a third and fourth expansion with relative ease, taking the close third and finally the high-yield expansion. You can lock the center down pretty easy with a few tanks on the high ground and a Planetary at the gold expansion. I recommend using a lot of drops on this map, simply because it can be quite hard for the Protoss to defend the main and their third simultaneously. Terran vs Terran Since both races here will have the same ways to take advantage of this map, this match is going to heavily favor trends in the general match-up, regardless of map. Since Hellions are very popular right now, you're probably going to see some Hellions if you play here. One thing you can do about that is make a small wall between Natural Expansion and your ramp. A single Barracks or Factory with an attachment on the low-ground wedged between your Orbital Command and your Ramp can force Hellions or other would-be run-by units to take the "long way" into your main, making it much easier to defend against. Overall though, the map is big, so drops are strong. Siege Tanks can also be used to shell either the main of your opponent from the closest base. To clarify, you can shell the Refinery at the main base by placing a Siege Tank at the adjacent third; you can shell the Refinery at the third base by placing a Siege Tank at the adjacent main. I think Banshees are a strong play on this map as well, particular for harassment later in the game. In particular, there is a lot of free space on the north and south edges of the map where mineral lines are exposed. There's plenty of room to hide back there in between SCV harassment. Terran vs Zerg Strategy For the TvZ match-up on this map, you need to be sure to put out consistent pressure. I think this is a good map for Terran players in TvZ as long as you don't let the Zerg player get too comfortable and over-expand. Most Zerg players will go Hatch first on this map, and as such, I really like a 2-Rax opener, especially if you are at least Gold League (any lower than that and you never know what the Zerg will open with). This way, you can put out early Marine pressure, slow down the Zerg economy, all while getting your wall-off ready. You can build the Barracks in a forward position and get them out pretty early. Pump out Marines and move out with 2 SCVs and try to drop a Bunker by the Zerg's natural expansion before the creep completely spreads. Do as much damage as you can, and when you finally get overwhelmed, lift both of your Barracks off and set them at the top of the ramp to your expansion. Add in a Factory (or a third Barracks) and make sure you have a Supply Depot or two ready to close the gap and you can make a tight wall.
Note that you want to make sure the building furthest away from your ramp has no Reactors or Supply Depots exposed. If your opponent goes for a Baneling/Roach all-in attack, you want to be sure they can't skirt any tanks you may have on the high ground and pick a weak point away from your main. The second Supply Depot is not necessary, but it does help strengthen what would otherwise be a weak point in the wall. While you are doing your early 2-Rax, it's helpful if you get a Command Center up during that time. Your 2-Rax is not meant to take out the Zerg player, but rather slow down their economy as much as possible so you can get your own expansion up so you don't fall behind. You just want to make the Zerg keep building Zerglings while your Command Center is being built so they don't get an overwhelming number of Drones. If they don't get out Roaches or Spine Crawlers, you can even tech right into Hellions from there. If they do, you will want to go higher up in Mech (Tanks) and start working on your Bio-mech army. Against Zerg players in the late game, you have to be sure to keep them honest and do not let them get too many bases. As a Terran player, the Gold expansion is takeable, but it can be risky. If you want to put tanks on the low ground by the PF where they would be safe, be sure to have energy or air units on hand in case you get hit from the high ground by the Xel'Naga. The center ground is hard to hold unless you put plenty of units up there, simply because it has so many openings and you can get surrounded very easily by Zerglings. In the late game, standard TvZ is how things go - grab a 3rd and 4th base equipped with a Planetary Fortress and mass up your Siege Tanks, Marines, Medivacs, Ghosts (if Infestors or Guardians start to come out), and Thors (if the Mutalisk cloud gets too large to handle with Marines). Of course, if you spawn clockwise to your opponent, you can opt to shell their main from your own third as mentioned above and end the game a bit earlier. Zerg Strategy Finally, a new ladder map that lets Zergs be Zerg. Here, you finally have enough space to safely take a hatch first, at least in some match-ups. Note that in ZvT and ZvP match-ups, you want to take down the destructible rocks early in the game at your opponent's third. When you take map control in the beginning, have a Zergling at the Xel'Naga, and a Zergling or two to intercept scouts. Have the rest of the Zerglings start working down the rocks. It is best to take them out ahead of time rather than wait for your opponent to get into position. Overlord Positions Note that on this map, there is very little space to hide an Overlord on the left or right side of the map, whereas there is plenty of free space to hide Overlords on the top and bottom edge of the map. This means that your ideal Overlord location will change based on your opponent's spawn location.
Blue: First Overlord; scouts timing of natural expansion. May also get a peak at tech If your opponent spawns top left or bottom right. If your opponent spawns top right or bottom left, you have to stick the Overlord in the corner to ensure its safety from Marines, Queens, or Stalkers. Green: Second Overlord; this Overlord helps scout tech and can be used as a sacrifice if youc an't get inside the opponent's base. Keep it in the safe position marked on the map, then move it up by the smoke screen before you send it in for a sacrifice scout. Orange: Good spot for a third (or later) Overlord, but only works should your opponent spawn top right or bottom left. Note that the location marked in red is not a safe spot to park your third Overlord; this can be hit easily by Stalkers, Marines, or Queens. You are best off using a Zergling at the third to check for timing or fly over with an Overseer. You could even park the Overlord at an additional "green" location in order to see timing of third - do not put an Overlord in the red area. Zerg vs Protoss While 99% of the time versus Protoss you will need to get Zerglings out to deal with pesky Probes (at least in the higher leagues), this is the one map where if you get lucky you might be able to get away with going Hatchery first. It really depends on how quick the Probe can scout you - if the Probe scouts the wrong way initially, you can get a Hatchery down. If you see a Probe in your base, unless your opponent is terrible you will likely have to get some Zerglings out. In this particular match-up, the map feels a lot like Metalopolis - it's big enough where you can take 4th and 5th bases in the late-game, whereas it can be hard for the Protoss player to defend three or more bases due to the sheer size of the map. Just like Metalopolis, you will run into your biggest problems on this map by letting your Protoss opponent get too big of an economy going. What you want to do on this map:
Basically, you just want to Drone up as much as possible on this map and keep your Zerglings positioned so you can see when the Protoss moves out. You can start a new Spine Crawler and have it finished by the time a Protoss can reach your base - just drop 1 Spine Crawler for every 3 ground units you see on the move-out. Once you get your third up and running, you can start to tech and make offensive units. Of course, you may need units earlier should the Protoss play a more aggressive opener. Zerg vs Terran On this map, you can expect most good Terrans to apply some early pressure (either 2-Rax or Hellions) and move in to secure their natural expansion pretty quickly. I don't see Banshee or any 1-base play being used very often here, just because the map is so large and it is so easy for a Terran to wall off their front and grab their expansion. Many Terran players open up on this map just like they would on Shakuras Plateau: 2-Rax pressure very early to delay your Hatchery as much as possible while they build their own expansion, then they move their Barracks into position to help wall off the natural while they tech up to Siege Tanks. Naturally, you need to scout and get out enough Zerglings to prevent this should the pressure be incoming. Note that a single well-placed Spine Crawler can defend most of the mineral line as well as guard the map up to the main. There is not much space behind the minerals at all, so Hellions that do squeeze back there can often get trapped by Zerglings and Queens. Since the map is large and set up in a way that lets you defend early pressure, I recommend going Hatchery first. Unless the Terran player does a super fast second Barracks (like by 12 Supply), you should have units out to defend and have your Hatchery out before any serious pressure can come your way. Good Terrans will be able to take their expansion easily and there is little you can do about this. Instead, just opt on building up your economy and tech as much as you can. From here, this game will turn into a typical ZvT. Due to the map's large size, Mutalisks are strong when the bases are close and weak when the bases are far apart. If you have your Mutalisk cloud harassing the Terran and the Terran attacks you, they will be way out of position. It is much easier to harass a close Terran player and get back in position in time for an attack. In other words, close spawn positions should make Mutas a bigger part of your army, whereas far apart positions favor Zerglings, Infestors, and Banelings. One thing you can do when spawns are far apart in order to make your Mutas more useful is to spread your creep as much as you can. Terran players shouldn't move out across creep (unless they want to lose all their light units to Banelings), so they will have to slowly pick off creep tumors, giving you plenty of time to get your Mutalisks back in position. Zerg vs Zerg Even on this map, I wouldn't opt Hatchery first in a ZvZ - there's just too much cheese potential. This map is big enough though that you can go for a 13-14 Pool/Gas build and get out fast Speedlings. This map is big enough that Roaches are hardly an offensive unit before Lair tech - they just move so slow by the time you get to your opponent's base they already have Spine Crawlers up and reinforcements. For that reason, early Speedling/Baneling play is strong on this map. Once you get past that initial stages, you can start to grab multiple expansions and play a typical late-game ZvZ, which tends to involve a lot of Speedlings, Roaches, Infestors, and occasionally Ultras/Mutas/Hydras should the tech progress that far. Starcraft 2 Antiga Shipyard Map Strategies - ConclusionGiven the size of this map, most match-ups lend well to macro games. Be sure to take advantage of the large map size and constantly drop and harass expansions, especially once your opponent is up to running on 3 bases. |
Don't be shy - share this page on G+ and Twitter!
Sign up for my Free Starcraft 2 Mini-Course where I reveal my best strategies not seen anywhere on this site!
Starcraft 2 Strategy Guide Privacy Policy Contact Us Disclaimer
©2013 www.osirissc2guide.com
