Starcraft 2 Fire in the Sky Brutal & Achievements GuideStarcraft 2 Campaign Guide --> Heart of the Swarm Campaign Guide --> Fire in the Sky (you are here)
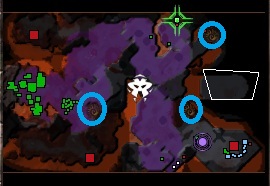
This mission and its achievements can be very easy, but only if you allow it to be. The key thing to know is that each Gorgon Battlecruiser spawns shortly after you destroy the previous one, and the Gorgons always start at the east end of the map and slowly crawl across to the west end. Therefore, you want to wait as long as possible before destroying each Gorgon, particularly the first one. The game tries to get you to destroy the first one as soon as the mission starts, but if you ignore this and wait until it gets really close to your base, you give yourself a few extra minutes! Fire in the Sky - Kerrigan Levels & Zerg Bio-Mass Locations While completing Fire in the Sky will not give you any Kerrigan levels in itself, there are 3 bonus levels available during the Fire in the Sky mission, which are unlocked by collecting the 3 Zerg Biomass samples. Simply move Kerrigan to the spots below marked with blue circles:
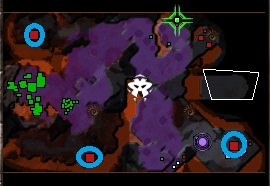
Starcraft 2 Fire in the Sky Achievements List There are 4 achievements that you can unlock during the Fire in the Sky mission in Heart of the Swarm: Fire in the Sky: Unlocked by completing all mission objectives in the Fire in the Sky mission (any difficulty). Red Alert: Unlocked by losing less than 5 units to the Gorgon Battlecruiser (any difficulty). Do not keep your units in the center portion of the map and do not run under a Gorgon and this is easy. Command & Conquer: Unlocked by killing the 3 Terran Orbital Commands (Normal difficulty or higher). Here are their locations marked on the map in blue circles (the green cross-hair is a scourge nest.
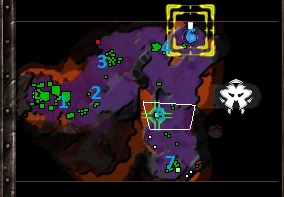
The bottom left base can be taken down by Kerrigan alone. The top left base can be slowly killed by Kerrigan as well, but it is easier if you use a handful of Queens. The bottom right base is heavily defended. If you try to do this achievement while beating it on Brutal mode, make sure you have a large army first before you go in with your units. Going, Going, Gorgon!: Unlocked by destroying 4 Gorgon Battlecruisers within 120 seconds of each other. This means that you will need to activate 4 Scourge Nests within 120 seconds of one another. Below, you will find a guide for exactly how to do this: Going, Going, Gorgon! Achievement GuideThis achievement is not too difficult if you follow the strategy that I am going to outline for you below. The key is to wait as long as possible before activating the first few Scourge Nests, and while this is happening, you should spread creep all over the map. This way, you will have 4 Creep Tumors in position ready to activate the final 4 Scourge Nests all at the same time. Here are the steps to completing this achievement:
Going Going Gorgon Video Guide This video guide demonstrates how you can complete the Going Going Gorgon achievement without too much difficulty. Just remember not to activate the first nests until the last possible second. If you are still struggling, do not be afraid to let the third Gorgon kill some of your stuff before activating the third nest while you finish clearing the map. Fire in the Sky Brutal Mode GuideBeating Fire in the Sky on brutal mode is much easier than the Going, Going, Gorgon! achievement. It requires the same strategies that you use for Going, Going, Gorgon - that is waiting until the last second before you activate the first few Scourge Nests. This gives you so much extra time over activating the first nest right away (like the game prompts you to) that you can complete the mission with On Brutal mode, the only real difference is that you will want a little bit more defense. About 7 Spine Crawlers and 3 Spore Crawlers in between the first and second Scourge Nest is ideal, with 2 Queens for back-up. Fire in the Sky Brutal Mode Video Guide |
Don't be shy - share this page on G+ and Twitter!
Sign up for my Free Starcraft 2 Mini-Course where I reveal my best strategies not seen anywhere on this site!
Starcraft 2 Strategy Guide Privacy Policy Contact Us Disclaimer
©2013 www.osirissc2guide.com


