Starcraft 2 Shoot the Messenger Brutal & Achievements GuideStarcraft 2 Campaign Guide --> Heart of the Swarm Campaign Guide --> Shoot the Messenger (you are here)
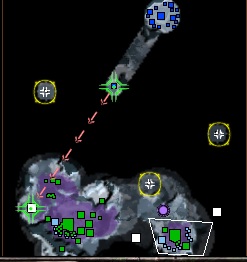
The key to beating this mission is to expand early and to use primarily Hydralisks instead of automated defense. Hydralisks are much more suited towards defending the Warp Conduits, as the unusual terrain and constantly changing paths the shuttles take are hard to deal with by using Crawlers. Additionally, Spore and Spine Crawlers do not fare well versus Carriers or Colossi, which are commonly seen in this mission. Kerrigan can handle Colossi with Kinetic Blast and Hydralisks can take down the rest with ease. An alternative strategy is to sit at home and mass up Hunter Banelings. You can mass up a group of 30 or so Banelings and rush-down the Docking Bays, ignoring the Protoss army and structures. You can repeat this 2 more times to end the mission early! Shoot the Messenger - Kerrigan Levels Completing Shoot the Messenger alone does not result directly in any Kerrigan levels. However, there are 3 bonus levels available during this mission, which can be earned by destroying the 3 containers holding Zerg Biomass at the locations marked below:
Starcraft 2 Shoot the Messenger Achievement List There are 4 achievements available for players to unlock during the Shoot the Messenger mission: Shoot the Messenger: Unlocked by completing all mission objectives in the Shoot the Messenger mission (any difficulty). Warp in Peace: Unlocked by not allowing the any Protoss shuttle to start warping (any difficulty). This means that you cannot let any shuttles get close to the Warp Conduit where you see the timer tick down. This can be done easily on casual mode, so consider doing this achievement there if you have trouble. Shuttles move much faster on Brutal mode, so it is definitely easier to do on a lower difficulty setting. Extreme Nexism: Unlocked by destroying 2 of the 3 Protoss Nexuses (Normal difficulty or higher). If you are using the Hydralisk strategy for My Cool Bay Explosions as described below, you can easily earn this achievement as you unlock that one.. My Cool Bay Explosions: Unlocked by destroying all 3 Protoss Docking Bays (Hard difficulty or higher). Note that this will end the mission early, so be sure to grab the Kerrigan Levels and destroy two of the Nexuses if you want to unlock all the achievements and earn all the Kerrigan levels in one play-through. Shoot the Messenger: My Cool Bay Explosions Achievement & Brutal Mode GuideWith the right strategy, it is possible to beat Shoot the Messenger on brutal mode while simultaneously unlocking all of the achievements. Below, you will find a step-by-step guide to exactly that as well as video guides going through how to unlock the various achievements and how to beat this mission on brutal mode. Step by Step Guide
If you run out of resources and still have not yet destroyed the Protoss base, you may need to re-try on Hard mode. Unlocking My Cool Bay Explosions on Brutal mode instead of Hard is more of something to do for fun than a necessity! Additionally, if you are struggling with this mission on Brutal mode, know that you do not have to go on offense if you do not want. Instead, you can sit back and defend. In order to do this easily, you should clear out all the small Protoss bases and structures and spread the creep as much as possible. Then, you can have 2 large groups of Hydralisks, which can defend against any attack and stop any ship in its tracks. Rather than use two packs of 18 Hydralisks, you can easily get 2 packs of 36 Hydralisks, which is plenty to stop any computer assault in this mission. Shoot the Messenger Video GuidesHere are a few video guides that you can follow along with in order to unlock the achievements and clear this mission on Brutal mode: Shoot the Messenger Brutal Mode Video Guide My Cool Bay Explosions Achievement Video Guide Extreme Nexism and Warp In Peace Achievements Video Guide |
Don't be shy - share this page on G+ and Twitter!
Sign up for my Free Starcraft 2 Mini-Course where I reveal my best strategies not seen anywhere on this site!
Starcraft 2 Strategy Guide Privacy Policy Contact Us Disclaimer
©2013 www.osirissc2guide.com


