Starcraft 2 Supreme Brutal & Achievements GuideStarcraft 2 Campaign Guide --> Heart of the Swarm Campaign Guide --> Supreme (you are here)
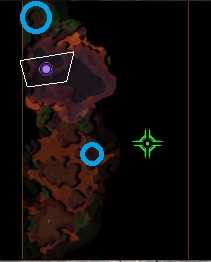
Since this mission relies primarily on micro instead of macro, this mission is likely going to be the toughest one in the game for most players to complete on Brutal mode. Fortunately, on this page, there is a guide to beating this mission on Brutal mode as well as how to unlock the Whose Queen Remains Supreme achievement. Supreme - Kerrigan Levels Completing the Supreme mission will result in 5 levels for Kerrigan. There are also 4 additional bonus levels that can be earned at this level, all by collecting the hidden Xel'Naga relics. There are 2 relics found on the way to the first boss, one on the way to the second, and one on the day to the third. Here are the locations marked with blue circles: Map 1
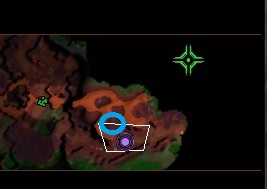
Map 2
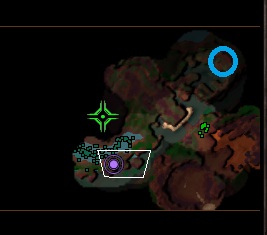
Map 3
Note that to reach this fourth relic, you will have to use Leaping Strike to jump a few times to get back there. Starcraft 2 Supreme Achievement List There are 4 achievements available for players to unlock during the Supreme mission: Supreme: Unlocked by completing all mission objectives in the Supreme mission (any difficulty). Endangered Species: Unlocked by killing 500 enemy units with Kerrigan in the "Supreme" mission (any difficulty). This is actually easier to do on Brutal mode, as there are more enemies in Brutal mode for you to kill with Kerrigan. Queen of the Jungle: Unlocked by completing the "Supreme" mission without letting Kerrigan drop below 100 life (Normal difficulty or higher). Repeat this mission on Normal mode and use the same strategy for completing this mission on brutal mode. If you can beat the mission on Brutal, you will find keeping Kerrigan's health above 100 on Normal is very easy. Whose Queen Remains Supreme?: Unlocked by beating the Supreme mission in under 12 minutes (Hard difficulty or higher). Guide below. Whose Queen Remains Supreme Achievement GuideThis achievement is definitely one of the harder ones to unlock, but you can clear the mission in about 11 minutes on Hard with the strategy below. You should read both the text-based guide below and then watch the video if you are struggling with this mission. It is hard to describe the boss-fight strategies in text, so be sure to check it out. Strategy With 12 minutes to complete this mission, you have about 3 minutes of play for each of the 4 maps. I find this to be a good goal to shoot for. Even though on the final map you only have to fight the final boss, he takes much longer than the other bosses to fight, so you want to be sure you have about 3 minutes left on the clock before you get to him. There are four things you should know in order to make unlocking this achievement easier:
As a result, you can just run with Kerrigan straight to the boss without stopping to attack any enemy units. You can use your Psionic Shift and Leaping Strike abilities to run through and jump over enemy units, while constantly using Mend to keep yourself at full HP. In the mean time, burrow any Primal Zerg forces you have. This will keep them safe until the boss fight starts. Once the boss fight starts, unburrow them and use them against the bosses. Having all your units for the boss fight is essential since their DPS makes defeating the bosses much faster. As far as each boss fight goes, the video guide below demonstrates how to take them all down in a short amount of time. Whose Queen Remains Supreme Achievement Video Guide Starcraft 2 Supreme Brutal Mode GuideWhen working on the Supreme mission in brutal mode, understand that there is no real time limit. Kerrigan can endlessly kite practically any boss, only using her energy for attacks when she is completely full. All the bosses have attacks which can hurt their own minions, which will help keep them from completely overwhelming you. As you kite enemies, use Psionic Shift over Leaping Strike to escape. The AoE damage it deals will also help clear out enemy minions. Always make sure Kerrigan has at least 50 energy so she has an escape if needed. Finally, you should always be using mend during all the boss fights. Kerrigan should always be at or near full HP. As far as clearing on the way to the bosses goes, be very careful not to lose any of your Primal Zerg. You will need all of them to help with each boss fight. During the actual boss fight, you will lose all your minions, which is okay, but on the way to the boss, you need to save them all. An easy way to keep your units alive is through Burrow. You can burrow the Primal Zerg (or Kerrigan) if you ever run into trouble on the way to a boss. Nothing can detect you, so you can use Mend, Burrow with Kerrigan, wait 10 seconds, pop up and Mend again, burrow again, and repeat until Kerrigan is at full HP. She can take out any pack of enemies this way, allowing you to keep all your Primal Zerg safe. Note: In the boss sections, I name the bosses' abilities. I do not know if these are the actual names or not, I am just using descriptive words to make discussing strategy easier. Yagdra Guide On the way to Yagdra, Kerrigan can clear the entire map, and there is no reason not to on Brutal mode. Make sure you grab both Xel'Naga relics on this map, even if you got them in a previous playthrough, as you want Kerrigan to be as high of a level as possible for the boss fights. Yagdra is the easiest of the 4 bosses in my opinion. Yagdra has 3 abilities: Burrow: At very regular intervals throughout the fight, Yagdra will burrow and reappear a few seconds later at another part of the map. When he does this, he leaves eggs. Sometimes, he leaves a lot of little eggs, whereas other times he leaves one big egg and a few smaller eggs. If he leaves the little eggs, use Psionic Shift to take them all down instantly, then run to Yagdra to deal damage. If he leaves a big egg, be certain to use Leaping Strike and a Dashing Strike to quickly take down the eggs. Fireball: Red circles appear on the ground, similar to the Archangel fight. You can move your units out of this if you want, but honestly it does very little damage - using Mend will heal you and your Roaches to full. Flame Cannon: This is the only really dangerous offensive ability of Yagdra. It is a curved lined of fire that follows the player as you try to run out of it (looks and functions similar to Diablo's lightning attack if you ever played the Diablo series). Since Yagdra is stationary, you have to run around him in a circle to get out of it. It will quickly kill your Roaches, so try to save as many as you can. Yagdra only does this twice in the fight if you keep most of your units alive, and by the second time he is almost dead (so it is okay if your Roaches die), so you really only have to dodge it once. The trick to this fight is staying on top of the eggs and using Mend regularly. You want to use your energy primarily to destroy the eggs rather than on offense against Yagdra. Psionic Shift and Leaping Strike are used to kill eggs. If any of the eggs hatch, focus on killing the eggs, rather than ignoring the adds. Use Kerrigan and your Roaches' auto attack to take down Yagdra. If you keep most of your Roaches alive, your auto-attacks will burn down Yagdra at a fast rate. Kraith Guide On the way to the second boss, you need to be careful in how you clear the map. The eggs should be taken down in 2-3 waves with your Primal Zerg safely hidden (burrowed). Kerrigan can slowly take down the eggs by using Psionic Shift. The remaining eggs will hatch, but Kerrigan can kite backwards near the starting area, attack them, then burrow when she is low on health. You should be able to clear out all the eggs without losing any Primal Zerg this way. After you pick up the third Xel'Naga Relic, you will have to fight a big pack of enemies. Kite them backwards until you are full on energy then use Psionic shift twice to take down most of them. Burrow if you need to in order to regenerate health and energy, and repeat the process. Kraith has 2 main attacks:
The first thing you need to know about the fight is that after the first charge, most of your units will die, and this is okay. You only need Kerrigan for this boss fight, so don't worry too much about saving your regular units. Just right click on the boss and let them do as much damage as possible before they go down. Since Kraith only has two abilities, none of which deal too much damage, there is not much to the strategy of this fight. When Kraith uses his Stone Spit ability, use Psionic Shift in order to go directly through Kraith, so you are standing behind him. Back here, you can get a lot of free hits off on Kraith with your auto-attack. This should be your primary source of damage. When Kraith uses charge, move out of the way. While the charge itself does not deal a huge amount of damage, if you are knocked back and stunned, Kraith's adds will deal a lot of damage to you. In order to deal with the adds, run away from them so they cluster up in a line, then use Psionic Shift to take them all down in one hit. You want to deal with most of the adds right away, as Kerrigan can otherwise use Mend to heal the damage dealt from Kraith's Stone Spit and Charge attacks, but she cannot keep up if adds are beating on her. You want to use most of your energy on Mend and Psionic Shift. Only use Leaping Strike if you are at a full 100 energy. If there are no adds up, you can stand there and use auto attack on Kraith for most of your damage. Slivan Guide Slivan is the third boss in Supreme. You can clear out the map on the way to her entirely with Kerrigan once again, so make sure you save up all your units for this boss fight. On the way to Slivan, as you head down the river, make sure you use Leaping Strike with Kerrigan to get to the Ravasaurs on the high ground. Also, be sure to grab the final Xel'Naga relic for the 4th Kerrigan level. It is on the top right corner of the map. You have to jump a few times to get it with Leaping Strike. Slivan only has 3 abilities: Spawn Creeper: Throughout the right, Slivan spawns a large number of Creepers. Just like you encountered on the way to the boss fight, these are Baneling-like creatures that move slowly and take a few seconds to explode. Their explosion will deal damage to the Ravasaurs. Corrosive Goo: Slivan lobs goo onto the ground which deals damage to your units standing on it as well as snaring them. Note that this does not affect the movement speed of Psionic Shift, but you still do not want to stand on it due to the damage. Summon Ravasaur: Throughout the fight, Ravasaurs will come in one at a time from the brush to attack you. You will want to kill these as you can, but it does not have to be a priority. Ravasaurs take friendly-fire damage from the Creepers, so you can often incidentally blow them up. Your units will not live very long in this fight, so you will want to rely primarily on Kerrigan here just like with the Kraith boss fight. You can take as long as you want to complete this fight, so no rush. What you want to do is keep your energy to full and circle Slivan as much as possible. Whenever you have a full bar of energy, you can use Psionic Shift to destroy most of the Creepers, and during this free time, you can get off a few auto attacks. Use Mend to keep yourself alive and just repeat this process. You almost never want to use Leaping Strike here since you want to save your energy for Psionic Shift to clear out the Creepers once they get to be too numerable for you to avoid any longer. Note that Slivan only has 4000 HP on Brutal mode (Kraith had 6000), so defeating her with just auto attacks does not take too long. Zurvan Guide As soon as you beat Slivan, your fight with Zurvan will begin. Zurvan is definitely the hardest of the bosses, but you will start with 11 friendly units to help you out. Here is a list of Zurvan's abilities: Tentacle Attack (phase 1 only): Red lines will appear on the ground, and Zurvan's tentacles will smash there, resulting in heavy damage to any unit within, including Zurvan's summons. Spawn Primal Zerg (phase 1 only): Throughout the fight, Zurvan will constantly spit out Primal Zerg units. These could be either Hydralisk and Zerglings or alternatively 1 Ultralisk and 2 Ravasaurs. Lightning Attack (phase 2 only): Zurvan nukes 1/3 of the platform with lightning. This is indicated by the triangle. After he uses this attack, a few spots of lightning will remain on the ground, damaging any units that enter the field. As soon as the fight starts, send all your units on Zurvan, and burn your energy on Leaping Strike. You should be able to get him down to 70-80% health before he even summons any units. You will likely lose your units shortly after Zurvan summons the first wave or two of units, this is okay. As long as they can do some damage before they go down, that should be perfect. The main objectives of the first phase of the fight is to avoid the tentacles and destroy the adds. If Kerrigan gets hit with any tentacle attacks on brutal mode, you will likely die. Also, you only want to spend your energy on healing and dealing damage to the adds. As soon as the Hydralisk and Zergling pack spawns, you need to use Psionic Shift twice in a row to kill off all these adds immediately. Use auto-attack to kill off any Hydralisks that remain. This must be done right away as this is by far the most dangerous pack. The Ultralisk and 2x Ravasaur pack is not nearly as threatening. You can use Leaping Strike twice in a row to burn down the Ultralisk. The Ravasaurs can be largely avoided and will die to the tentacle attacks or to Psionic Shift when you use it on the next wave of spawns. You will inevitably take damage from the adds when they spawn. This is okay, as long as you kill them. Every 2-3 waves, there is a 10-15 second reprieve, at which point you can Mend to full HP and use auto attack to deal damage to Zurvan. As long as you dodge all the tentacle attacks, you will gain your HP back here. If you do not kill the adds right away however, you can be in trouble. The second phase is very easy. Zurvan stops spawning units, so if any remain, be sure to kill them off. Do not use any energy on offense. Instead, each time Zurvan points the triangle at you, use Psionic Shift to move to a safe spot. Once there, stand there and auto attack until you have to move again. The video guide below should help you with any trouble you are having with any of these boss fights. Additionally, make sure you save your game before each boss fight, so you can re-load the game if you mess up. Supreme Brutal Mode Video Guide |
Don't be shy - share this page on G+ and Twitter!
Sign up for my Free Starcraft 2 Mini-Course where I reveal my best strategies not seen anywhere on this site!
Starcraft 2 Strategy Guide Privacy Policy Contact Us Disclaimer
©2013 www.osirissc2guide.com
