Starcraft 2 The Shattered Temple Strategy and BuildsStarcraft 2 Strategy Guide --> Starcraft 2 Map Strategies --> The Shattered Temple (you are here) In this article, I will be going over the best builds and strategies you can use on The Shattered Temple, which is an active 1v1 ladder map in Starcraft 2. There are so many different ways which a map can impact the strategies you use, and this map is no exception. I will be covering race each race in depth, as well as covering how the terrain effects players of all races. Shattered Temple: Map Overview
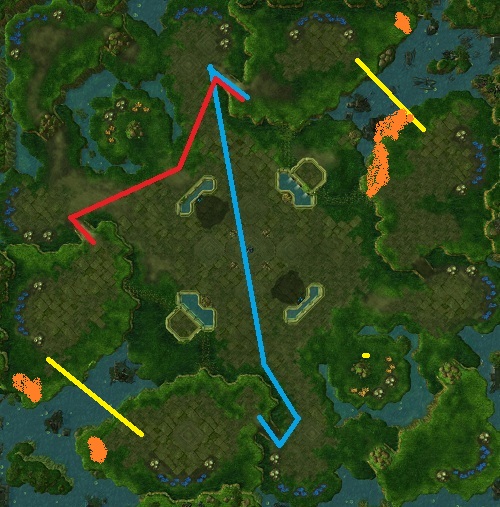
Spawn Locations As you can see, there are 4 starting locations on this map, and by default on ladder you can spawn anywhere (including forced spawns). Spawn location can drastically impact the strategies used. If both players spawn at the north-eastern bases (12 o'clock and 2 o'clock) or the south-western bases (6 o'clock and 8 o'clock), the rush distance is very, very close by air. Alternatively close spawns at the opposite locations are very close by air:
The red line represents the relatively short distance by ground between close one set of close spawns. The yellow line notes the extremely short distance by air between the opposite set of close spawns. The orange represents the blind spots which are popular drop locations, highlighting the importance of drop and air play when spawning close in the east or west. The blue line represents the moderate rush distance between far spawns. It is still close enough for an early push but leaves each race with enough time to prepare. Main Base Despite the close base locations as mentioned above, the actual size of your base is very large. This leads to Players would be smart to scout orange areas early in the game before walling off and then placing Pylons, Supply Depots, Overlord, or Creep in those locations to reveal them for later. If you leave these locations in the dark, players will frequently completely unload drops in these locations then move for the mineral line. Players also can successfully hide unusual tech choices in these locations in their own base. If a player seems to have less units, economy, or tech than they should, this is often a place where their hidden technology and structures may be located. Despite the close rush distance, the main bases feature very narrow ramps which can be blocked off by a single Protoss force field. While the rush is common on this map, when defending your main, it is important to use this ramp to your advantage. Expansions The natural expansion here features a very narrow choke may lead players to believe that very fast expansions are a good choice on this map. As you will see in the race-specific strategy section, this does not apply for all races. However, you do want to get up your natural quite early most of the time, and the backdoor entrance is not a real threat early in the game since players have to break through 2 sets of rocks to access it. It is much more common for players to break down their own set of rocks by the expansion so they can access the corner expansion as their third or fourth base (depending on race match-up and strategy). Protoss Strategy - Shattered Temple Builds While The Shattered Temple is a fairly balanced map overall, it is particularly strong for Protoss in the early portion of the game. The short distances and small ramps make the 4-Gate a very strong option, especially if your opponent grabs a quick expansion. Things can also get a bit complicated on this map when it comes to taking a third base. The very large size of the main base combined with the distance to either third (the corner or gold expansion) makes it very hard for Protoss to defend against drops in the late game. Let's look at some specific Protoss vs each race match-ups on this map for more specific strategies: Protoss vs Protoss Given the close spawn locations on this map, you can count on 4-Gate being the go-to build every time. Right now, it's hard to envision opting for anything but a 4-Gate. If your 4-Gate fails or the opponent opts for a 4-Gate as well and you successfully defend, Blink Stalkers make a good transition. A surprising amount of PvP matches on this map will never make it out of 1-base play, even in the upper echelons of the rankings. One thing to consider is when trying to push the opponent (or defending a push) that the ramp to the main base is very narrow. You can defend your main by a single force field. You can also have your army split in half by a single force field if you try to push up your opponent's ramp. For that reason, it can be really difficult to break an opponent even if you get a slight unit advantage. One way to get around this is if you are able to squeeze out a few unit lead, produce a few extra Probes and if you get very far ahead. You can afford to produce a few probes and keep your opponent on one base without losing your contain if you lose less units. Eventually with a few extra Probes out, you can afford to research Blink or expand without missing a warp cycle of units. Don't force the win on this map if you 4-Gate just because it's so easy to get cut off by a single Sentry, which can quickly turn the tables. If you get way ahead and want to finish it, warp in a few rounds of Zealots. Let your Zealots push up the ramp first and only go up with your Stalkers your Zealots are up the ramp. If you get force-fielded, pull your Zealots back to the edge of the ramp so your Stalkers can hit the enemy's stalkers from the low ground. Protoss vs Terran On this map, you have two viable options against Terran players: 3-Gate Fast Expand builds or a 4-Gate and just going all-in. I recommend opting for the first and only opting for the 4-Gate if the opponent lobs up a free hit (i.e. fast expands on the low-ground). With the 3-Gate, you will want to produce 5 Sentries so you can wall off the choke to your natural if the Terran pushes hard. Any less and you will not have enough energy to keep up force fields for a meaningful amount of time. Once you set up your natural expansion, the question becomes what to tech into for a longer-game play. Naturally, while you do need to consider what units your opponent is getting, I will say that I really dislike the traditional Protoss Colossus/Gateway ball on this map, just because there are a lot of points where your Colossus is vulnerable to Viking play. You will want to get Blink for your Stalkers to help protect Colossi on this map. My preferred build here would be a gateway-heavy High Templar/Charge-lot/Archon/Sentry and upgrade-focused army. The tight choke points really allow you to get off great storms and force-fields, making this play pretty strong on this map. Of course, you can always add Colossus into the army or use them as a switch, particularly if your opponent gets too many Ghosts. Alternatively, you can start with Colossus and switch over to Zealot/High Templar/Archon tech once the opponent produces a lot of Vikings. Protoss vs Zerg This map is really great for the Protoss player in early-game PvZ. If the Zerg fast-expands, you can 4-Gate here extremely successfully. The rush distance is very short and there are plenty of places to put down Proxy Pylons. The narrow ramp is very easy to defend against a Zergling counter-attack. Furthermore, the narrow ramp makes force-fielding the space between the main very easy. For this reason, you want a good number of Sentries when you push on the natural of the Zerg player. You can keep the Zerg player from reinforcing from the main nearly indefinitely by keeping force fields up on the ramp, making a 4-Gate very, very effective move. Additionally, the Forge-Fast expand works great as a build on this map vs Zerg. You can put down your first pylon just past the natural expansion on the low ground, and then wall off your base with a Forge followed by 2 Gateways. You can then drop a Photon Cannon behind the wall there and then plant your Nexus. You can even grab the Nexus earlier if the Zerg player has not scouted you or goes for a Hatchery-first build. Note that you can reinforce your wall with a Cybernetics Core and may need another cannon or 2 if the Zerg tries to all-in off of one base. There are a lot of natural follow-ups to the forge-fast expand on this map. I really like a Stargate-Phoenix play at this point. This allows you to catch up in tech (Forge Fast expand really slow down tech), lets you put on a lot of pressure with a small resource investment, and lets you pick off Overlords which may be spread all over the map. After the harass, any Phoenix you built can help defend your third base as well as keep scouting the map in case the Zerg gets a little over-zealous on expansions. Another option would be the 6-Gate if you want to put on pressure. This a good move if the Zerg attempts to double-expand to make up for your fast-expansion play. Note: Researching Hallucination for your Sentries and then hallucinating Phoenix can be a great way to scout the map quickly for little investment when you have walled in on a forge-fast expand. Terran Strategy No matter what type of Terran player you are, you are not at a disadvantage when playing this map as Terran. The natural expansion is very easy to defend thanks to the tight choke and high ground, and you can take the third (gold) expansion very easily and set up a Planetary Fortress there. Drops and Tank Play This map is very favorable to both drops and Siege Tanks play. Drops work great on this map simply because the size of the main is so large. You can easily unload full drops on the spots marked in orange on the map at the beginning of this article, stim the Marines and Marauders, and then run into the mineral line. This is least effective if your opponent spawns in the 2 o'clock (east) position, simply because there is not a good blind spot behind the mineral line. On the other hand, this is extremely easy to pull off if your opponent spawns at the 9 o'clock (west) position and you spawn at the 6 o'clock (south) position. It is just a short drop distance and you can drop off your units in that large nook in the bottom of the base. If you do not spawn at close locations by air, you can still effectively harass your opponent's expansions with Siege Tanks. In particular, the gold expansion is very vulnerable to tanks. You can set up your Siege Tanks on the opposite side of the water from your opponent's army, set up in Siege Mode, and then shell the gold expansion. It works very well - just make sure you have enough army support there to protect your tanks. You can combine these two strategies to make them even more effective by doing them at the same time. You can set up your tanks to siege the gold base, and while your opponent is scrambling to defend that, you can move in with a small drop to the main. You can inflict a lot of damage this way, especially if the bulk of your army is with your tanks. Terran vs Protoss As a Terran player, you should look to play a longer game on this map most of the time on this map against Protoss. It is impossible to push up the ramp of a good Protoss player just because a Protoss can wall off with a single Force Field. The only thing you have to watch out for in the early game here is pushes to your natural expansion depending on how early you want to take it. A Protoss 3-Gate fast-expand can easily turn into early pressure and force fields on your ramp if you try to expand off a single Barracks. A lot of players like to throw down 1-2 Bunkers at the natural when taking it initially. You can then salvage these later once you get out Siege Tanks (which work very well when placed on the high ground over looking the choke to your expansion). Vikings are very strong on this map versus the Colossus. There are multiple locations on the map where you can engage Colossi with your Vikings while simultaneously being safe from Stalkers.
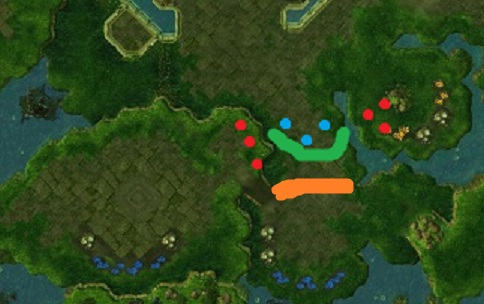
As an example above, if the Protoss Colossi' are blue dots, and the Gateway-ball is the green line, and the bulk of your army is the orange line, then you would position your Vikings in either of the positions where the red dots are. This would put either a body of water or a wall in between the opponent's Stalkers and your Vikings. You can also use the body's of water in the middle to engage the Colossi where the Stalkers may not be able to easily each. You can often snipe a Colossi or two before the Protoss player can respond, particularly if they do not have Blink. Even if you lose a Viking or two - always remember that Colossi cost a lot more than a Viking (or even 2 Vikings) and take forever to build. As mentioned earlier, drops (particularly multi-pronged drops) become very strong on this map against a Protoss player on 3 bases. It is too hard for all but the pro-level Protoss players to handle dual-pronged drops at the furthest expansion (or tank-drops if there are cannons up at the gold) and the main at the same time. You can practically take out a Protoss player on this map just by turtling with tanks and Vikings in good position and just sending out 2-3 pronged drops steadily. Terran vs Terran On Shattered Temple, things are pretty standard in TvT match-ups. Just like against Protoss, drops are very effective in the late game when players reach the 3-Base mark. Some other things to consider:
Terran vs Zerg In TvZ match-ups, on this map, the spawn locations can have very big implications on your overall strategy. On close spawns, you can win practically every game up until the Diamond league just by getting out two fast Barracks, pumping Marines and then Bunkering up at the opponent's natural. The tight choke makes it hard for a run-by, and the close distances allow you to easily get up a bunker outside your opponent's base early on. The standard TvZ bio-mech build works good. Here are some things to remember:
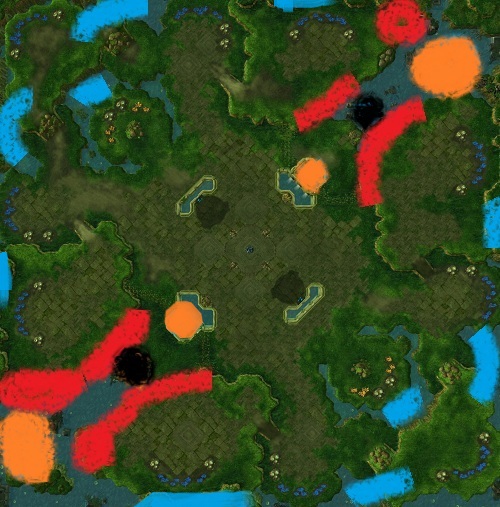
Another thing that is very important to your success at this map if you decide to play a macro game is expanding. You can take the 3rd and 4th base very easily, though I would recommend making both of these Planetary Fortresses. This way you can keep the bulk of your army at the entrance to your natural, and the two other entrances are defended by Planetary Fortresses. Note that the gold expansion is a very easy third base to take, especially if you opt for the Planetary Fortress route. Zerg Strategy - The Shattered Temple In Lost Temple (the old version of Shattered Temple), winning as Zerg as practically impossible, and as such the map was changed into what we know as Shattered Temple. In the new version of the map, Zerg's strengths have become the opposite of the Protoss on this map - the beginning of the match can be very scary for a Zerg player, but once you have secured your natural expansion, you can be very strong in both mid and late-game play. Overlord Spread One of the great things about this map is that there are so many good places you can keep your Overlords. As a Zerg player, you should never be in the dark about what your opponent is doing. You may have to sacrifice an Overlord or two, but with proper positioning you can always have an idea of what the opponent is doing. Here is a map with all of the best Overlord locations:
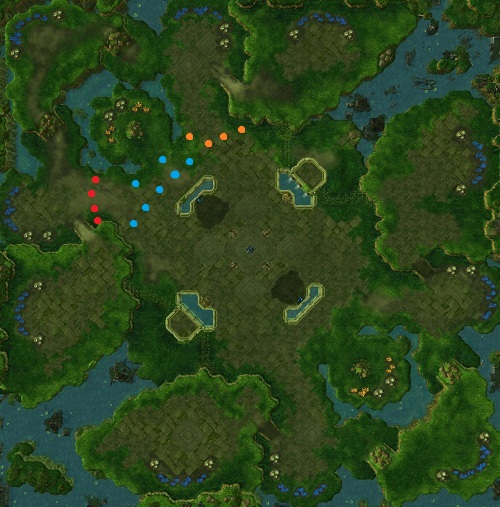
Orange: Good spots to keep Overlords for a fly-over at the 5:30-7:00 minute mark. This typically involves sacrificing this overlord, but it is worth it to find out what your opponent is up to. Black: Good spot to plant your Overlord to grant vision to the high ground, particularly for the blind spots (marked in red). With your Overlord in this position, you are in a good spot to plant a Nydus Worm. Blue: The first locations you should take with your Overlord. The locations around the natural will spot for expansions, and involve sitting on high ground or over the water where ground units cannot reach. Additionally, note that there is some space on the ledges of each main where ground units do not have vision. You can sit Overlords or Overseers here safely if the enemy does not have air units. Note that this does not work well versus Zerg, because an Overlord can spot your Overlord easily and a Queen can then take it out. Zerg vs Protoss Strategies Versus a Protoss player, the Zerg's biggest challenge is surviving the initial portion of the game. I always recommend getting a Spawning Pool down before your expansion, just because a good Protoss player will punish you severely for doing this. Since a Forge-Fast expansion is great for Protoss players on this map, if you throw down a Hatchery first, they can easily cannon rush you and it is very hard to stop, especially given the limited space to operate behind the mineral line. That is of course assuming you can even plant the Hatchery - most good Protoss players will drop a Pylon at the natural location to prevent you from landing a Hatchery. For this reason, it is really beneficial to get your Spawning Pool down first. Once that is down, you are free to take your natural expansion. On this map, what you do next really depends on what you scout. Hopefully at this point you have moved two Overlords into a good position - one at one of the blue spots near the natural on the map above and one near the orange spot outside your opponent's base. You can use these Overlords to scout for expansions or buildings. You should sacrifice the Overlord at the orange location at the 5:30 mark to see what exactly your opponent is doing. This means you can see a 4-Gate ahead of time or whether they went for a fast expansion. If they did a forge-fast expand, you can either opt to double expand (take 2 total bases) or opt for the 2-Base Hydralisk strategy. If you see air coming, the 2-Base Hydralisk strategy works great - you can pump out a solid number of Hydralisks and break down their front door long before they can get out Colossus tech if they opt for a fast expansion and air on this map. This way you do not have to defend three bases against Void Ray and Phoenix harass as well. If they go for a three-gate fast expand, you need to be careful about any sort of early aggression. Many Protoss players like to go for 6 Gateways out of this and go for a win right there, especially if they see you are not making any units. The proximity of the natural to the main, the short rush distances between bases, the tight choke, and the ramp that can be walled off with a single force field make early pressure so effective as a Protoss player against a Zerg here. Spine Crawlers really come in handy versus Protoss players at this map. Here is an example of spine crawler placement as the game progresses if you spawn at the 9 o'clock (west) base:
Red: After you take your natural and see an unusual number of Gateway units. Blue: After you take the gold expansion and hit your upper limit of Drones, regardless of Protoss unit production. Move the 4 "red" spine crawlers into these positions and create a few more. Orange: Once you take your 4th expansion, you can complete the wall by dropping a few more Spine Crawlers here. The Spine Crawlers are not meant to act as a real defense, but if you take a ton of bases they can stall your aggressors just enough time to give you the time so you can cover the map. Once you progress to this point you can play the PvZ match out like any other late macro PvZ. Note that once the Protoss player gets on three bases, Mutalisk harass can become very effective. In particular, bouncing in between the gold expansion and the natural can be very frustrating given the Protoss player would have to cross the water to make it there. If the Protoss player has the gold expansion and no air units or blink Stalkers, this is guaranteed to be an effective harass. Zerg vs Terran The ZvT match-up here has a lot of similarities to the ZvP. Terran players can and should put pressure on you with a Barracks and a Bunker if you try to grab a very fast Hatchery, although if you are laddering and do not know spawn locations, you may be able to go Hatchery first here sometimes. Here are some of the biggest worries a Zerg has versus a Terran player here:
Tight chokes make it very hard to attack the Terran player from the front. Like usual, you want to spread your creep out to the center of the map and engage in the center, which is open and perfect for getting good surrounds with Zerglings and Banelings. If the Terran player has turtled up, do not engage directly. Instead, the large base but tiny ramp to the main make this a great map for "doom drops'. You can load up a bunch of Overlords with Roaches and Lings and do a ton of damage to the Terran main before the Terran player can clean it up, and easily re-macro back at home before the Terran can counter. With the Terran's infrastructure taken out, this match is much easier. Also, if the gold or corner expansions are orbital commands and not Planetary Fortresses, you should send 20 Zerglings to this base to clean it out every time you attack or harass. No reason not to use a double-pronged attack when the other player makes it easy. Zerg vs Zerg Zerg vs Zerg is always an unusual match-up regardless of map. Due to the short-rush distances, if spawns are close, you are bound to see a lot of early Zerglings and Banelings. You should always go Spawning Pool first here as a Hatch-first build is suicide if the opponent scouts you out. On the other hand, this is one of the few Zerg vs Zerg matches that routinely progresses to 2-base play just because the natural and main are easy to defend. You can block the ramp easily with two Queens, and well-placed Spine Crawlers in the natural can defend both the ramp and the natural simultaneously. This is one map where Zerg can really put out a lot of defense against early Zergling pressure with relatively few units. Clogging the ramp with Queens and placing 1-2 Spine Crawlers is a very effective defense if you are trying to out-econ your opponent. Given that breaking up the ramp is hard, I think 2-base Roach play works good here. Naturally, ZvZ is so volatile so it's hard to define specific strategies for this map, since you both have the same units and buildings. |

Don't be shy - share this page on G+ and Twitter!
Sign up for my Free Starcraft 2 Mini-Course where I reveal my best strategies not seen anywhere on this site!
Starcraft 2 Strategy Guide Privacy Policy Contact Us Disclaimer
©2013 www.osirissc2guide.com