Starcraft 2 With Friends Like These... Brutal & Achievements GuideStarcraft 2 Campaign Guide --> Heart of the Swarm Campaign Guide --> With Friends Like These... (you are here)
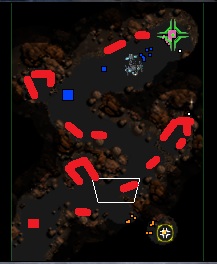
There is no time limit on this mission, and the computer's buildings will never be reconstructed, so take your time when clearing across the map and this mission is easy. With Friends Like These... Kerrigan Levels There are no Kerrigan levels available during the With Friends Like These... mission, nor are there any bonus levels available. Starcraft 2 With Friends Like These Achievement List There are 4 achievements available for players to unlock during the With Friends Like These... mission: With Friends Like These...: Unlocked by completing all mission objectives in the With Friends Like These... mission (any difficulty). MinedCraft: Unlocked by collecting all the mineral nodes during the With Friends Like These... mission (any difficulty). Here is a map with the locations of the mineral nodes marked (with thick red lines):
Space Ace: Unlocked by not letting the Hyperion get hit by any Mag Mines during the With Friends Like These... mission (Normal difficulty or higher). These are easily dodged by using the "Jump" ability. Ludicrous Speed!: Unlocked by completing With Friends Like These... in under 11 minutes (Hard mode or higher). Guide below. Ludicrous Speed Achievement GuideThis is a tight timer, so you will need to progress through this mission quickly in order to hit the 11 minute timer. You do have time to gather all the mineral patches, but you do not have time to stop and heal nor do you have time to go for the bonus ability from clearing out the bottom right. The cooldown of your Yamato Cannon should dictate the pace of the mission. For the most part, you will want to only progress as far as your Yamato Cannon will allow you (2 per Ordnance Tower early, 1 per tower later). Your auto attacks and Fighter Strikes should rarely (if ever) be used against Ordnance Towers, instead you will use those to fend off enemy attacks and units. If you progress across the map in this manner you will never have to head back to the flagship to heal up. In order to make the 11 minute timer, once or twice you will need to be more aggressive than normal when you see a repair bot drop. You can push in, use all your units from your Fighter Strike, and when you lose them all, jump back to the repair bot, then go back in. This will allow you to take out a heavily fortified area in a short amount of time. Ludicrous Speed! Video Guide With Friends Like These... Brutal Mode GuideThe key to beating this mission on brutal mode is to take your time and to get all the mineral upgrades. There is no time limit so you can go as slow as you like. Never allow the Hyperion to drop under 1000 HP when the enemy has Battlecruisers out, as you do not want to be surprised by a Yamato Cannon. If you need to, head back to the flagship in order to heal up. You may need to wait for a Repair Bot drop in order to push forward on the final base. A step-by-step guide and video walkthrough can be found below. Step by Step Guide
With Friends Like These... Brutal Mode Video Guide |
Don't be shy - share this page on G+ and Twitter!
Sign up for my Free Starcraft 2 Mini-Course where I reveal my best strategies not seen anywhere on this site!
Starcraft 2 Strategy Guide Privacy Policy Contact Us Disclaimer
©2013 www.osirissc2guide.com


