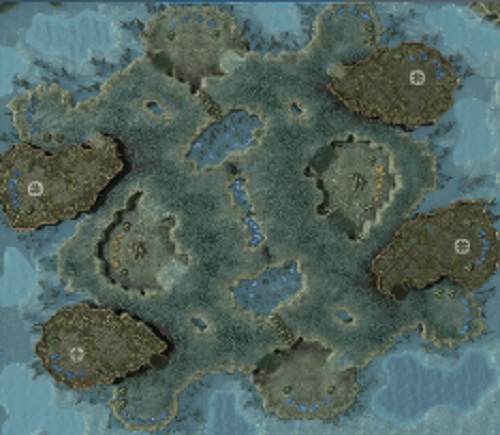
Starcraft 2 Abyssal Caverns StrategyStarcraft 2 Strategy Guide --> Starcraft 2 Map Strategies --> Abyssal Caverns (you are here) Abyssal Caverns is one of the new Starcraft 2 Season 3 1v1 ladder maps. In this article, you will be learning what builds and openers are strong on this map and how you can use this terrain to your advantage. Abyssal Caverns Overview
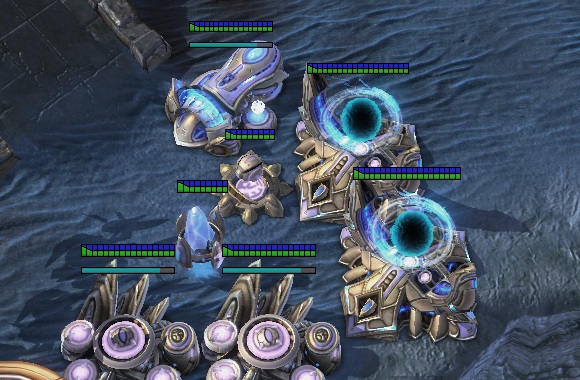
Spawn Locations and Expansions Abyssal Cavern features fairly spread apart spawn locations, and travelling between each base does take some time. Adjacent positions take about 35 seconds for Probes to move between, whereas cross-spawns take about 50 seconds for a probe to move across the map. Note that same side (left/right) spawn locations are very close by air but are similar distant by ground to top/bottom spawns. This is because of the way the ramps point; ramps point away from each other on north/south spawns and close to each other on east/west spawns. Overall, distances between bases are large enough to make early expansion plays quite viable and very strong. On the other hand, close distances by air on left/right spawn locations make air plays (Mutalisk harass, drops, etc) a very viable option should both players spawn in those locations. Drop Locations Note that each base is not the same with regards to how much space is around it. In particular, the north-east and south-west spawns (2 o clock and 8 o clock) have a lot of open space behind them, whereas the north-west and south-east spawns (10 o clock and 4 o clock) do not have much space behind the mineral lines. This means that you can drop directly into your opponent's mineral line if they spawn at the 2 or 8 without being scouted until the very last second, but you cannot do it if they spawn otherwise. As a result, if you and your opponent spawn on the same side of the map (left or right) and they are at one of the spawn locations that has a big open area in the back (2 o clock or 8 o clock), it will strongly boost air harassment and drop plays. You can even swing around and hit the natural expansion without being scouted - this is not the case for your opponent. As a result, let's say you spawn at the 10 o clock and your opponent spawns at the 8 o clock. As a Terran player, you might load up 2 Medivacs with 8 Marines each and move along the water to the back of your opponent's base where they cannot see you. You could then split the dropships and have one drop in the main mineral line and one drop in the expansion. This dual-pronged drop is devastating and when the spawn locations work out like this it is incredibly easy to execute. Protoss Strategy Overall, this map is not particularly good or bad for Protoss players. The long rush distances and easy to defend natural expansion allows Protoss to secure a second base quite early in the game. On the other hand, the third base is quite far away and the gold base has two ramps, making both bases hard to defend, especially if players spawn on the same side of the map. Protoss vs Protoss Strategy As expected, 4 Gates still reign supreme on this map for PvP. The map isn't quite big enough for other plays to be too effective, and there are plenty of locations to drop Proxy pylons (such as the center behind the vision guards or at the gold/third expansion). Additionally, the ramp to the main can be tougher to hold on this map due to the size. You will need two Force Fields to wall this ramp as opposed to 1, and without force fields you can get a lot of Zealots and Stalkers up this ramp. Given the map's size, a 3-Gate Blink Stalker build is also a viable option if your micro skills are good enough to take full advantage of this ability. There may be some PvP macro games or even a Robotics Facility on this map should players spawn cross positions, but if players are adjacent it will not be common. Protoss vs Terran PvT on this map boils down to this: your natural expansion is very easy to take, but your third is extremely vulnerable. Your options on this map really boil down to spawn locations. If you spawn on the same side of the map (both left or both right), things can be dicey. The gold expansion here is simply not a viable third because of Siege Tanks, and any other third base is fair enough away that it is very susceptible to drops - both on the high ground and low ground. If you take your natural third, a few Cannons can go a long way. The biggest problem with the natural third is that Siege Tanks can set up on the high ground and shell it from a very advantageous position. It can be hard to counter in this situation because a few tanks on the high ground behind a wall of units can easily defend the Terran main and natural, while a Planetary Fortress is likely to be at the third. If the Terran player takes the gold, consider either moving Stalkers or better yet a High Templar to the high ground. A few Psionic Storms or even Blink Stalker harassment from the high ground can pick off a lot of SCVs. In general, Blink Stalkers are good on this map in order to skirt Terran defense and harass. Should your Terran opponent siege up outside your third, you can simply Blink into the main to force them to retreat. If you get adjacent positions on the top or bottom, the Gold is your best bet for a third. If you do take the gold, be sure to drop a proxy Pylon (or 3) on the high ground around the expansion and even consider a few Photon Cannons. The pylons on the high ground will prevent Marines and Tanks from attacking on the high ground and avoiding your cannons. You can also then warp units up here in order to defend your base. No matter where you spawn, I don't really think early aggression on this map is a good idea unless the Terran tries to 1-Rax expand or you like to cheese with Proxy Gateways. A 4-Gate will be too slow against a Terran player and 2 Bunkers on the low-ground can easily protect both the natural and the main. Proxy Gateways can work if your Terran opponent does not scout it, just because the wide ramp is a bit vulnerable to that type of play. In general, I think cross-map positions or even east/west spawns can lend to a macro game, but if you spawn adjacent to your opponent you are best off sticking to two base play. Open with 2 Gate/Robo into an expansion so you can get an Observer out and be well on the way to Colossus Tech. A 2-base timing push with Colossus and Blink Stalkers can be deadly, especially if you come up the side of the base opposite of the natural. Should you spawn cross-spawns, taking a third is safer - just be sure to invest the requisites in Pylons, Cannons, and scouts so you don't get surprised at your third. Protoss vs Zerg This map is built for Forge-Fast expanding against Zerg players. The natural can be walled off easy and there is enough distance between bases that you have plenty of time to wall off:
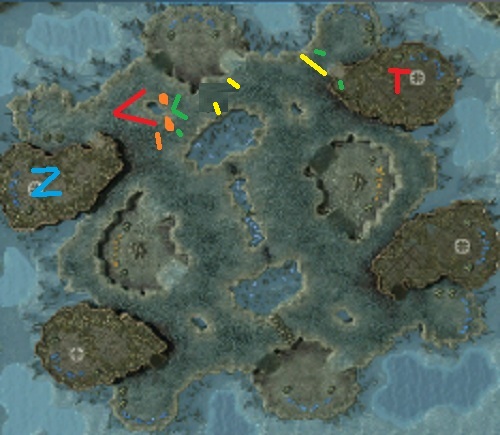
Note that if you can, you want to try to hold off on making that wall as long as possible and instead spend the units on a Cybernetics Core if you can. In other words, you only have to drop 2 Gateways like pictured above if the Zerg player moves out with 6+ Zerglings towards your base. If you see that coming (be sure to scout the Zerg base), get your wall up right away with 2 Gateways like shown above. If the Zerg player only gets out 4 Zerglings (or less) you can afford to just get up the Forge, Gateway, and a single cannon. If more Zerglings come out, you will want to seal it off - but still wait as long as possible (i.e. it takes 30 seconds+ for Zerglings without speed to move across the map). The ideal build is to go Pylon --> Forge --> Gateway --> Pylon --> Photon Cannon --> Nexus --> Cybernetics Core (completing the wall-off), but if the Zerg gets out a bunch of Zerglings or throws down a Baneling's Nest/Roach Warren instead of an expansion, you may have to use 2 Gateways to wall it off and throw up a few extra Photon Cannons. If the Zerg player goes Hatchery first, I recommend just throwing down a Pylon and Cannon Rushing the natural. You have an early Forge up anyway so it's an easy and natural transition. This is an easy win and even if it fails the Zerg player loses tons of mining time. If you scout it too late, go Nexus prior to Photon Cannon instead so you can catch up. From here, you have two options. If you spawn on the same side of the map, I think that fast air units (Voids/Phoenix) works out very good due to the short air distance between bases. If you spawn cross-spawn, it depends on what the Zerg does. If they try to push off of two bases or take a reasonably-timed third base, tech up to Colossi. If they double-expand and go up to three bases really quickly, a 6-8 Gate timing push off of two bases works very well. The third base is so far away that you cannot spread creep over by the time your 6-Gate is up and running, which makes it an easy win. If you do decide to 6-Gate, try to get out +1/+1 (armor and weapons) - you should be able to Chrono Boost this out without much trouble, and if you attack a Zerg that double expands at the start of the match they will be 0/0. Just remember that if you wall in for a Forge-Fast expand build, be sure to research Hallucination. This way you can Hallucinate Phoenix to scout the map to see if the Zerg grabbed a third or is going for a two-base play. It's a lot cheaper and faster to do this than it is to get up a Robotics Facility and then getting out an Observer. Terran Strategy Whenever there is a map where all the expansions are on the low ground, I am a big fan of Terran. There is also plenty of good areas to drop, and banshee harass. The only thing Terran players don't have going for them here is that they can't really lock down the middle, simply because there are too many paths going through it. On the other hand, the chokes through the middle mean that it is going to be much harder for Zergs to surround the Terran, so it goes both ways. With that said, let's look at some specific Terran Strategy. Terran vs Protoss No matter what your spawn location here is, a fast expansion build can be a pretty good bet. Whether you go for 2-Rax into an expansion or 1/1/1 depends on what your opponent does. If you see them getting up more than 2 Gateways, you might want a second Barracks, or at least want to put 2 Bunkers up on the low-ground. However, if you spawn on the same side of the map, I think a 1/1/1 build is very strong so you can get out either early Medivacs or Banshees. Air plays are so strong on this map when you spawn on the same side due to the close distances by air. Even better is if you spawn on the same side of the map as your opponent, and the Protoss ends up in the 2 or 8 o'clock position. There is enough free space for a Banshee to swing between the natural expansion and the main base and hit both mineral lines with just a few seconds of flying in between (but much longer by ground). The open space between the two bases means you can easily retreat to a location where Stalkers cannot reach you, and if your opponent grabs an early expansion and does tech straight for Robo Facility, you can often do a ton of damage with Cloak. Since you can hit both expansions with the same Banshee and there is plenty of room to operate, it would take a ton of Cannons to block your attacks and provide detection. As a Terran, you can handle your bases much easier by using a Planetary Fortress. The Gold can be frustrating to take as Blink Stalkers can sit on the high ground and hit your SCVs. If you want to go for the gold, consider placing a Siege Tank or Two by the Planetary Fortress and then putting a Supply Depot or two on the high ground to provide vision. As far as late game play, harassing the Protoss player is key. You do not let them take 3 bases uninterrupted. The third base is very susceptible to Hellions, since it has two entrances and the Probes do not really have anywhere to escape too. It can also be shelled easily by tanks on the high ground - though this does leave your main vulnerable to counter attack. The main and natural are both quite vulnerable to drops (Marines or Hellions) as they are Banshee harass as mentioned above. In general, a bio-mech build works good for hitting the Protoss with. Once you take out any side expansions, push right into the front of the natural with your Siege Tanks. Get just enough Vikings to take out Colossus, and bring a Raven for Point Defense Drone and so it can get vision of the high ground. From the low ground, you can hit a lot of the Protoss buildings. You can even start shelling the mineral line in the main from the low-ground, and then slowly push up the ramp into the main once the Protoss has been beaten back. As per usual, you will want Ghosts to deal with High Templar and Vikings to handle the Colossi. If your opponent goes a very Zealot and Sentry-heavy mix, blue flame Hellions are a good addition and have the added bonus of being great at harassing the third base. Terran vs Terran Strategy Ah, TvT. While it can be hard to squeeze the ever-popular Hellion into the front of the base due to the small choke point, if your opponent decides not to wall off this is always a viable option/opener. Additionally, if you spawn on the same side of the map, Hellion drops work well on this map. The distances between bases are fairly fair by ground but close by air, and the tight choke point means you should be able to defend with relatively few units should your opponent decide to counter. If your opponent spawns at the 2 or 8 o clock position, they are also vulnerable to a fast Cloaked Banshee. There is so many angles to hit from and there is plenty of safe room to hide from Marines. You can force a lot of scans this way. You can also easily bounce between the main and the natural and inflict a ton of damage with a single Banshee. The third expansion, regardless of whether it is the gold or not, is particularly vulnerable to attack. Hellions work well here as do Siege Tanks. Once the game progresses to this point, it will be all about air superiority. The biggest problem will be Siege Tanks sitting on the high ground. You can also use this yourself to shell your opponent's third. Whoever has air superiority will win out here; use Vikings to control the skies and then Banshees and your own tanks to pick off tanks shelling your own third. If you are the aggressor, move up close with your tanks and block off vision due to your high-ground status and air superiority. Terran vs Zerg In TvZ, your build here should be dependent upon spawn location. If you both spawn on the same side of the map, opening with Reactored Hellions and then going right into a double Starport with cloaked Banshees is extremely strong. This is particularly the case if the Zerg players spawns in the 2 or the 8, just because those areas are susceptible to Banshee play. If you both spawn on the top or bottom of the map, a 2-Rax opener works well. You can get two fast Barracks up to apply pressure and even try to throw down a Bunker at the natural expansion. Even if this does not win the game outright, it slows down the Zerg tech and Drone production and allows you to safely get up your own expansion without allowing the Zerg's economy to run rampant. If you do spawn at cross-locations, odds are a simple 1-2 Rax will be your build of choice. If you do spawn at cross-spawn locations, this is actually a good map for the macro CC build, since the third base is far away. You can get up a very fast third Command Center in your main and use it for MULEs and SCV production while using 1-2 Siege Tanks on the high ground of your main base to protect both your main and natural. This works great on this map in particular if you are cross-spawns. If you very good at using this build you can even use it on both top or both south spawns. I do not recommend it on same-side spawns (both left or both right) just because this build can suffer at the hands of Mutalisk harass and those spawn locations are ideal for Mutalisk play. Later in the game, Terran players will do well to harass the Zerg third. Hellions work great for this purpose. You can also drop the main and natural simultaneously quite effectively. You can even do all three at the same time for a devastating attack: 8 Marines into the main (10 supply), 8 Marines into the natural (10 supply) and 4 Hellions into the third (8 supply). This can be a great way to spend any extra minerals you may accumulate, as all of these units require no gas (except the 2 Medivacs you need to drop into the main and natural. Even if you just trade with the Zerg here, taking out tons of Drones is without a doubt a huge advantage since replacing Hellions and Marines is so simple. The biggest thing you have to worry about on this map against Zerg players is moving across the center of the map. The split down the middle can be dangerous, especially with the two line of sight blockers in the middle of the map. You don't want to rush into the center if there is a pack of Zerglings and Banelings on either side of that split waiting to pincer your army. Think of it like the middle of Xel'Naga Caverns and the way Zergs will pincer around the open space in the center of the map. The best way you can defend this is to set up at a choke point with spread tanks, and use a scouting party of a few Marines to pick off creep tumors and gain control of the Xel'Naga in the center. Once you have that and vision, you can more safely move across the map. However, even then you may be vulnerable to counter attack if the Zerg player moves around your army and heads for your main. For this reason, a good strategy can be to use a lot of drops to cripple and starve the Zerg while you hold down your own defenses around several expansions. Adjacent Spawns - Both Top or Both Bottom - This is the ideal situation for Terran players, particular if the Terran spawns in either the 2 o'clock or 8 o'clock positions, as this makes it easier for the Terran player to wall off (see diagram below for more info): What you can do is go for a Marine/Siege Tank heavy timing push. As an opener, opt for 2-Rax early aggression if the Zerg goes Hatchery first, and if the Zerg goes Spawning Pool, do a more relaxed 1-2 Rax opening into an expansion. Next, tech up fast to Siege Tanks, and get out Marines with Combat Shield and stim and get ready to move out. What you want to do is set up with Siege Tanks at the destructible rocks in between your base. You can even drop a Bunker or two here and load it with Marines. At the same time, you want to wall off your flank with Barracks so you do not get surrounded:
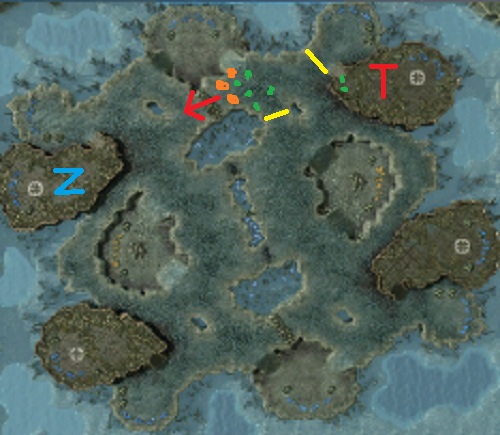
Red T: Terran Spawn As you can see, this works much better when the Terran is in the 2 o'clock or 8'clock position and the Zerg is in an adjacent spawn. The little body of water is in a position that really is favorable for the Terran this way. You can wall off with 2 Barracks plus a Supply Depot or two to prevent a flank.
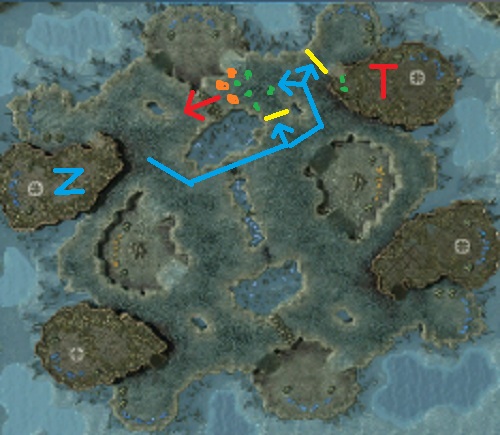
Zerglings can still run through the low ground expansion or through the path closest to your base. However, if they run through the low-ground expansion it is hardly a flank and your Siege Tanks will shell them the whole time. if they run through the entrance closest to your base, your 2 Siege Tanks on defense will shell units as they run by, plus your Siege Tanks will have vision the entire time. This is noted on the map above. Once you have this initial set-up rolling, you start to push through the rocks, moving very slowly and continuously reinforcing your army, to build up:
The speed in which you can progress into this situation can be highly variable. If the Zerg tries to trade and loses most of his army, you can push forward really fast to set up that advanced position, particular if there isn't any creep spread to that area. Additionally, note that you will want to move the Barracks that walled off the area in the center of the map forward. You do not want to necessarily wall completely off there though as you do not want to block your own reinforcements from coming in and you do not want to prevent your Marines from retreating from Banelings. You do not want to just leave the Barracks behind though because they will be vulnerable to attack if you move forward and leave them out there undefended. You can even pull them forward and use them as part of your push by wedging them around the third to block movement and shore up the wall. As you build more Bunkers, you can start Salvaging your old Bunkers for and get 75% of the cost back. Don't be afraid to leap-frog slowly as a methodical and steady push is what this is all about. You do not have a long distance to travel, so if you are consistent you will be walled up outside the Zerg's natural in no time. Just remember you don't have to end the game on this push, and you can continuously strengthen this contain. You can add in Thors and Missile Turrets should the Zerg player start to tack on a lot of Mutalisks. However, a Zerg player on 2 bases will not be able to come up with a large Mutalisk cloud and still produce the Zerglings and Banelings they will need to break a contain like this. While the Zerg is contained and you are leap frogging your way in and waiting for the creep to recede, you can take a third base of your own. The Gold expansion works fine here; just be sure to use a Planetary Fortress and put up a few Missile Turrets so you do not have to divert your attention from your contain. If the Zerg happens to have a third base, you were probably slow or they were extremely aggressive. You can keep the Zerg player to two bases by opening with Hellions and transitioning into the mech build, as Hellions make the Zerg stop expanding and forces them to get out early Roaches, which really throws off their tech path. Regardless, if the Zerg does take a third base, do not send your whole army after it. You do not want to spread yourself too thin. A single Medivac full of 8 Marines is plenty to take out an expansion if you have the natural locked tight with a Siege Tank and Bunker wall. This build does take some time to practice and in my opinion is harder to execute than a typical bio-build, it is something a lot of professional and top-tier players do and it is extremely effective on any map where Terran players have a straight shot at the Zerg base without any good spots for the Zerg to surround a Terran. You do have to use buildings to create false walls here so you don't get surrounded, but it is still an extremely devastating push and practically a guaranteed win when you get good at it. Zerg Strategy While the gold expansion is tough to grab as Zerg on this map, the rest are not. While I wouldn't say this map is as good as Metalopolis for Zerg, it isn't all that bad of a replacement. Zerg players will fair better off here than Shattered Temple simply because the extra 5-10 seconds between bases really makes it much easier to secure the natural expansion. If your creep spread is good, taking the third (and fourth and fifth) isn't so bad either. Overlord Placements
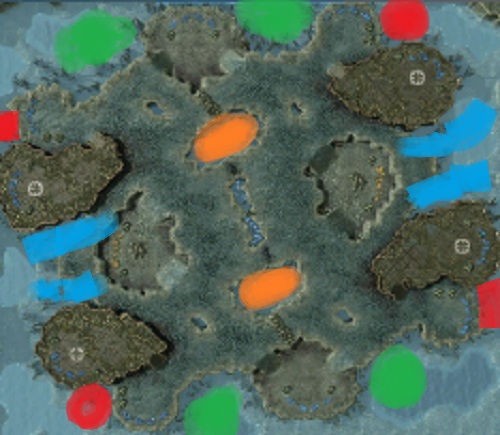
Red: First Overlord, in between natural and main. This lets you see when your opponent takes their natural and also can tech structures hidden in the main near the mineral line. Light Blue: Second Overlord, can be used as a sacrifice early in the game if needed to check for tech. You will want to replace this as later in the game it will be able to scout the gold as well as spot drops moving along the outskirts of the map. Orange: You can safely place Overlord over these gaps in the map which will help you scout unit movement across the center of the map. You may want to get this as your second Overlord if you have already scouted that your opponent is rushing (2 quick Rax, Gateways, fast Pool, etc). Note: You will want to fill up both of these positions with Overlords. Green: Fourth Overlord; this can scout to see when the third base goes up and can also be used to gain more information around the natural expansion. Zerg vs Protoss Strategy Against Protoss players here, you never want to go for a Hatchery-first build. The reason for this is that this map is perfect for Protoss players to go Forge first. If you go Hatchery first and they go Forge first, expect a cannon rush that will be practically impossible to stop. Yes, you can pull off 4 Drones per Pylon but even then a good Protoss will really make you pay if you go Hatchery before Pool. As a result, I think getting a Spawning Pool and even a fast gas build (13 Pool / Gas --> Expansion) is a solid build here. This will give you map control and can allow you to take a third while simultaneously denying any scouting information. Be sure to set up an Overlord in the light-blue position to sacrifice around the 5:30 mark to check for 4-Gates or whatever sort of tech your opponent is going. Fortunately, if the Protoss does decide to 4-Gate, you can really do well here by dropping Spawn Crawlers at your entrance as this will protect both your natural and your main. Be careful of early Blink Stalkers though, particularly when you both spawn on the same side of the map. Getting out fast Speedlings is the answer when faced with that. In PvZ on this map, your job is to survive while expanding rapidly. It is very easy to get up a third base and defend it as Zerglings can move from the natural to the third in just 6-7 seconds if creep is spread and Zergling speed is done. On the other hand, it takes the Protoss player an eternity to reach their third, and running Zerglings into the mineral line at the third is a very effective strategy. If the Protoss player decides to drop a bunch of Photon Cannons and take the gold, consider a Baneling drop or placing Hydralisks or Mutalisks on the high ground and hitting the mineral line from there. This is quite effective. If you spawn on the same side of the map, Mutalisk harass is very effective here. You can bounce between the natural and main without a problem as both mineral lines are exposed to the same space of air. Macro up a large army of Infestors, Roaches, Hydralisks, Corruptors, Zerglings, and Banelings (not necessarily all of them, of course dependent upon unit composition of opponent) while keeping the Protoss to two bases. If you do not allow the Protoss to secure an easy third, things should pan out well on this map for you. If you let the Protoss take map control and set up a third base without causing any economic damage though, and odds are no matter what you do you are going to lose the game. Zerg vs Terran Strategy This map is not bad at all for Zerg players in TvZ if you can handle one thing: creep spread. I recommend getting out a third Queen on this map and dedicate it to nothing but creep spread. Creep spread here will help you defend your third and stop pushes across the middle. While paths around this map are fairly narrow, there are so many paths you can take on this map and puts you in a great position to surround the Terran player. You can take down the destructible rocks and give yourself even more routes to move through the map to surround the opponent. The trick here is to make sure that your creep is spreading across all of these paths, not just to your third or just to the Terran's base. You want to have access to the best path that will allow you to pincer the Terran ball if they try to move out across the map. Once they have Sieged up outside your third and are shelling it, you are forced to engage in a bad position or sacrifice that expansion. Alternatively, if you have good creep spread, you can force the Terran player to stop and kill off creep tumors before engaging, at which point you can move your units into position. With good creep spread you can reinforce your third in under 10 seconds, which makes defending it very easy. As an opener on this map, it is within the realm of possibility to go Hatchery first, but it can be risky if the Terran player opens up with 2-Rax pressure. The bases are not particularly close - but also are not particularly far. It's a bit of a coinflip if the opponent is at an adjacent spawn, but a good move if you are cross spawns. If they are adjacent, it is safer to opt for Speedlings first. I do like to go Hatchery first versus Terran here simply because Hellions have gotten so popular again on ladder lately. Be sure to protect yourself versus drops and Hellion run-bys; spread Overlords along the outskirts of the map and get out some Mutalisks to take down Vikings which try to pick off those Overlords. Throw down a few Spine Crawlers at your third and be sure to spread the creep behind the Gold if you take that expansion (along the high ground). This will provide vision and let Speedlings chase down Hellions here. Also, be sure to sacrifice an Overlord at around the 6:30 mark in order to check for Banshee rushes. This is particularly important should both players spawn on the same side of the map. If you spawn adjacent to the Terran (both top or both bottom), you can be in for some trouble if they do the mech build mentioned above. If that is the case, you might be best off macroing as best you can and going all-in on two bases with nothing but Roaches and Banelings. Those spawn locations on this map on ZvT just do not favor the Zerg player at all. Zerg vs Zerg In ZvZ on this map, the map is just big enough that players do not have to worry about getting 6-Pooled or 8-Pooled. You have time to open up with 13 Spawning Pool/Fast gas to get out early Speedlings. If your opponent 6 Pools and you go for a 13 Pool, your Pool will have finished for a few seconds before Zerglings arrive. If they 8 Pool you might even have your first set of Zerglings out. I do not however recommend going Hatchery first. The map isn't small, but it isn't big either, and as such you will lose far more often then you will win out on that gamble. Speedlings are really strong on this map, as not only is the map moderate-sized but the ramp is somewhat wide. This means that two Queens can make a Zergling-tight wall. This makes if perfect for running Speedlings into the main to cause all sorts of problems. This is another reason I like opening 13 Pool; the fast gas lets you take advantage of Speedlings here so you can run into the main via the larger ramps this map has. Starcraft 2 Abyssal Caverns Strategy ConclusionYou should now have a pretty good idea how you can use Abyssal Cavern's terrain to your advantage, regardless of whether you are Terran, Protoss, or Zerg. Terran players will find success by using buildings to create artificial walls to help close down the many access points here, whereas Zerg players will do well to take advantage of all the many routes they can use to surround their opponent's army. |
Don't be shy - share this page on G+ and Twitter!
Sign up for my Free Starcraft 2 Mini-Course where I reveal my best strategies not seen anywhere on this site!
Starcraft 2 Strategy Guide Privacy Policy Contact Us Disclaimer
©2013 www.osirissc2guide.com
